
Showing posts with label Digital Art. Show all posts
Showing posts with label Digital Art. Show all posts
Saturday, March 17, 2012
Krystal
Please Don't Cry...

Yes I did redesign Sombra but I think I'm gonna keep old Sombra around for a little bit for more vent type art like this.
Design Practice


I don't believe I have anything to do with these characters so I may try selling them off. That or I'll find things to do them.
I think my favorite of the three is the Rough Collie. That one turned out the best.


Thursday, February 9, 2012
Name Your Own Price Commission Batch


1) Icon commission for Likeshine. I've always loved her character. Green or black...doesn't matter. Still a really beautiful gryphon.
2) New years picture for FurrFreak. It was the first anthropomorphic picture I'd draw in a long while and I'm actually pretty happy with how it turned out. Really love this guy's colors and the way his feathers were.
3) Badge for Aledaroth. I still need to get this printed, laminated and mailed out to him. I might not do too many badges until I get a good printer and laminating machine.
4) Chibi for ooSukioo. Complete with a Nyan Cat plushie.
I need to redo the prices however for these commissions. They will be raised in the future because for the work and time I put into these, the price is too low.
Power to...Regret Nothing?

I also uploaded progress shots of this months ago but didn't finish this until recently (a few weeks ago). Most of my digital paintings take forever but I didn't mean for it to take so long. Class work got in the way of me finishing this before halloween so I could use it for an icon I can use it for an icon this Halloween though.
Mostly practice for 1) drawing a bird's beak from a front view, 2) semi-realism (drawing something "realistically" but not going all out on texture like I usually do, 3) drawing a semi-realistic literal Tatoba, and 4) lighting/shading. While I like doing realistic work, I think I prefer this way of painting it more. Mostly because it's more time efficient and it doesn't wear my hand out as much.
The eyes turned out more pink than purple but the effect still works just as well.
I don't know if I'll draw him under Putotyra's influence again. I like him much better as a happy character. Yeah, he's a joke character and thus technically "not mine", but I still gave him a personality and everything for fun. And I made him happy, optimistic, and a bit "derpy" (for lack of a better word). So for the most part he'll stay that way.
Monday, October 24, 2011
The same, Blue! Ikenami Ryunosuke!


That title would make much more sense had I drawn ShinkenRed first...
So I figure that I could revisit my idea of drawing all 199 Super Sentai by painting 800 x 800 px. paintings. Plus I wanted to get back in the swing of painting stuff and I felt like drawing a picture of ShinkenBlue so...I did.
Did a bit of a step by step of how this got done too.
1) Sketch. It's really scratchy and even I can barely tell what's going on there. But it didn't need to be tidy since I wasn't relying on line art.
2) Flat color. Pretty self explanatory. Just laying out the basics of his helmet and what's drawn of his suit.
3) Blocking out shading and lighting. Initially I was going to use red lighting but I decided green would look better. That and I have a weakness for lime green. Just kept this part mostly loose. It doesn't need to be very details as that parts saved for the next step.
4) Detailing. Which is the last step. It's just comprised of smoothing out all the colors that were laid out in the previous step by using the color dropper tool and the paintbrush on a low opacity. And...
Voila. The finished product. I guess all I have left to say is...1 down. 198 to go.
Sunday, June 26, 2011
Art Trade and CatDog Chibi


First up, an art trade with Rileyy on FA of her fursona, Riley. Really I had opened up a slot for one request on Twitter to get used to drawing with my tablet since I don't have a scanner with me. But turned it into an art trade. But I ended up taking two "requests" anyways. The second one should be done today. I think what I don't like about the process of drawing directly on photoshop is the sketching. My sketches don't turn out nearly as clean but on the flipside, they get finished so much quicker.
Second is yet another CatDog drawing. Partially for tablet drawing practice, partially to not be bored. Not to fond of Dog's eyes here though...
Tuesday, June 14, 2011
Finished Commission and Tatoba WIP


Really was hoping to get that WIP image finished by the end of the day but had to do more shopping for stuff I need before I leave for LA on Sunday. Long story short...my poor mood from a few days ago ended up coming back and I'm tired. But I got a good start on it.
Anyways, first picture is a chibi commission for Grizzlybane on FurAffinity (FA). Chibis are always fun to draw 'cause...they're so adorable.
Second picture is that progress shot. It's pretty much what happened after watching way too much Kamen Rider OOO. Not gonna really get into details about what the show is about, but the "default" combination for OOO is called "Tatoba", a name created by combining together the names of the animals that the Rider armor and abilities are based off of:
"Taka" which means "hawk". Which is the head of OOO costume.
"Tora" which means "tiger". Which is the torso of OOO costume.
"Batta" which means "grasshopper". Which are the legs of OOO costume.
It was my "brilliant" idea to try to create a critter by actually combining all three of those animals as well as using the main color combination for the Tatoba combo, red, yellow, and green (as well as black). Hawk and tiger are easy to combine. Pretty much you get a wingless gryphon with that combination. Grasshopper threw it off a bit for me though. I couldn't figure out how to make the grasshopper legs completely work with the body so I modified the legs a bit more than I really wanted to in order to make it work. They're a mix of tiger and grasshopper...ish. Tiger since they're still covered in fur and are facing the direction tiger legs face. Grasshopper for the length and the feet.
If I weren't trying to mimic the set up of the OOO outfit with the critter's design, I probably could've made the anatomy a bit more fluid. But I wanted to mimic the set up of OOO costume.
Only the facial and neck markings are done so far. I've really got to blend those colors a bit more while still keeping the red, the yellow, and the green distinct. Hopefully I'll finish it...later on today (it's midnight...it's "tomorrow" already).
I gotta try my hand at animal-izing some of the other OOO combos. I definitely want to try my hand at making an animal version of my personal favorite combo, Tajador (Taka/Hawk, Kujaku/Peacock, Condor).
Thursday, June 9, 2011
Draw-a-day: Days 3 and 4


My "draw a day" challenge is kinda falling apart. Mostly on my part due to disinterest in drawing anything. Due to emotional instability...but anyways...
There should be a lot more drawings than this but still...First one is of a character I haven't drawn in a long time named Avariya. It's her smaller form which looks a bit like a Corgi/Husky mix. She's got a larger form too in which her wings are attached to her body and she looks like a very large (giant) Malamute mix. I gave her quite a bit of design/marking touch ups from the last time I drew her. Sadly I don't have that much of my old art of her...
Second is of the illusion pokemon Zorua. Not the best thing I've ever drawn...not even close. But I need to get used to not being such a perfectionist which is actually very difficult for me. Aside from the glowing eyes, I don't like this one at all.
Friday, February 19, 2010
Autumn Badge WIP- Flat Colors

Art trade with LolAutumn on FurAffinity.
Her fursona's incredibly derpy and always has her tongue lolling out so I couldn't pass up drawing her like this. And on her ref sheet it specifies that she has a huge nose. So of course I had to give her a huge nose.
Just have the flats done for now. Having a little difficulty with the shading so I'm starting over with it. Either that or I'll move on to working on a different picture for now. I do want to try to get through some of the shading though for now.
Friday, January 8, 2010
Majin Badge Walkthrough
Just a little walkthrough showing how I shaded a badge. I tested out a style of shading I haven't practiced in a year or two, but I thought the style would suit the badge rather well.
The character depicted is Majin copyrighted to BlueWolfCheetah on Deviantart. Art is mine though.
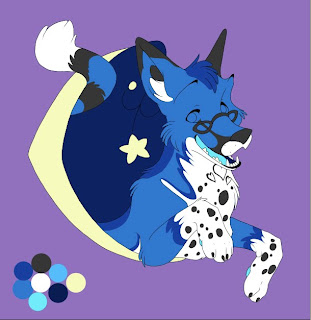
Just the base colors. Nothing really drastic or interesting as of yet. Typically I put the base colors of all the markings and such on the same layer, but this time I separated them out in order to do the sort of shading I wanted to.
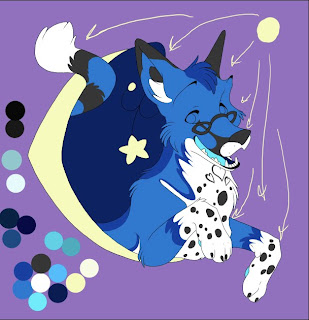
Lighting is my weakness so I blocked out the direction the lighting is going to be coming from.

Working on the shading. I'm doing it gradient style. Used to be really popular and now that I can actually figure out the style, it's sort of fallen out of popularity a little bit. Shame...it is a beautiful style.
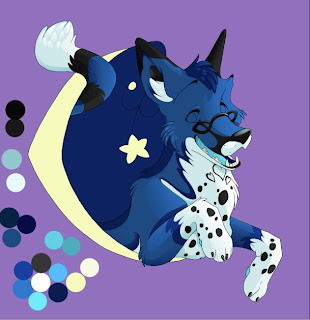
And shading all done. Basically the shading is done on layers of the colors/markings done. Not nearly as much room for mistakes as opposed to if I put the shading on a separate layer from the colors. However to get the right colors to blend together, putting them on the same layer works rather well. If you want to see how it's done, Kuitsuku's tutorial shows it really well: .

Add the background, backlighting, and shine. Had to change the background color so I could clearly see the glowing off the moon and stars so I could go back and tweek them later. Background's just a simple sky. Take two shades of blue. Use the gradient tool and add small stars (put the stars on a separate layer though). The stylized moon and stars...I put a lighter color inside and on a separate layer the glow is the same color as the "inner glow". Use an airbrush on low opacity to get the glow effect.

Eyes are always the last thing I color. Usually I go more detailed than this, but this is a bit more simplified version. The glass in her glasses was the very last detail one. It's a pale blue with a layer of white gradient shine over it. Bother layers are lowered in opacity to give the illusion of glass.
This is more of a walkthrough than a tutorial. However if you have any questions about the process, don't hesitate to ask. Most of this can possibly be covered in Kuitsuku's tutorial however.

Sunday, March 29, 2009

I needed to add in my plan for a background here. So I looked at a few pictures. Most of them had fox kits playing or laying in tall grasses. So that's what I'm choosing to use here. Initially I was going to add in a fox/wolf den back there so it doesn't look like she wandered too far away from home since she's a baby.
I planned on having this finished in time for Anime Central so I could have something else to sell there. Unfortunately, due to the picture's complexity, I don't think that's a possibility. So I'll just continue working on this slowly. I do want to add in her eyes soon. It just looks weird without them. But I do love how this is coming along.
Friday, March 13, 2009
Realistic Vulpix for the Newbie
So I just joined up here 'cause I've lurked around and I like the site layout so I decided to join it. This'll be my site for all my better works as well as stuff I'm working on for animation in terms of storyboards and character designs. So for my first post is the current thing I'm painting: a realistic baby Vulpix.

I may be 19 but I still love pokemon for the sheer fact that they are extremely fun to draw realistically. Vulpix is one of the easier ones to render, but I hope to try my hand at some of the more difficult ones. I had a lot of references for this 'cause I haven't drawn a realistic fox before. But it was a little difficult at first to try to figure out how to render the fur. I used photos as well as 2 tutorials to try it out and I'm really happy with how it's looking so far. For people familiar with pokemon and particularly the pokemon Vulpix, you may (or not) be wondering about why she doesn't have 6 tails. Well I was reading some of the game descriptions of this pokemon and they say that baby Vulpix are born with only one purely white tail and as it grows it splits into 6. So I decided to play off of that and draw a Vulpix with a mostly white tail that's partially split in two.

I may be 19 but I still love pokemon for the sheer fact that they are extremely fun to draw realistically. Vulpix is one of the easier ones to render, but I hope to try my hand at some of the more difficult ones. I had a lot of references for this 'cause I haven't drawn a realistic fox before. But it was a little difficult at first to try to figure out how to render the fur. I used photos as well as 2 tutorials to try it out and I'm really happy with how it's looking so far. For people familiar with pokemon and particularly the pokemon Vulpix, you may (or not) be wondering about why she doesn't have 6 tails. Well I was reading some of the game descriptions of this pokemon and they say that baby Vulpix are born with only one purely white tail and as it grows it splits into 6. So I decided to play off of that and draw a Vulpix with a mostly white tail that's partially split in two.
Subscribe to:
Posts (Atom)